Raum erstellenCreate a room
Ein Raum ist euer gemeinsamer Spielstand. Alles, was ihr eintragt, liegt dort – online, unter einem Raumcode.
- Beim allerersten Start wählst du die Sprache (DE oder EN). Umstellen kannst du sie später jederzeit oben rechts mit dem Globus-Knopf.
- Im Startmenü Neuer Soullink wählen (zu zweit) oder Neuer Nuzlocke (allein). Hat dein Partner schon einen Raum, nimmst du Raum beitreten.
- Schritt 1/2 – Edition: euer Spiel auswählen. Die Edition bestimmt die Liste der Arena- und Rivalenkämpfe und damit eure Level-Caps. Ein grüner Haken heißt: Kampfdaten geprüft.
- Schritt 2/2 – Generationen: welche Pokémon-Generationen im Spiel vorkommen können. Beim normalen Spiel passt die Vorauswahl, bei einem Randomizer wählt ihr alle erlaubten Generationen.
Danach landest du im Cockpit, der Startseite des Raums. Deinen Raumcode siehst du oben rechts neben den Avataren und in der Karte „Erste Schritte“.
Alle Schritte gehen auch mit der Tastatur: Tab bzw. die Pfeiltasten wählen aus, Enter bestätigt, Esc führt einen Schritt zurück.
A room is your shared save. Everything you enter lives there – online, under a room code.
- On the very first start you pick the language (DE or EN). You can switch it any time with the globe button in the top right.
- In the start menu choose New Soullink (as a duo) or New Nuzlocke (solo). If your partner already has a room, choose Join a room.
- Step 1/2 – edition: pick your game. The edition sets the list of gym and rival battles and therefore your level caps. A green check means: battle data verified.
- Step 2/2 – generations: which Pokémon generations can appear. For a normal playthrough the preselection fits; for a randomizer select every allowed generation.
After that you land in the Cockpit, the room’s home page. Your room code is shown in the top right next to the avatars and in the “First steps” card.
Every step works with the keyboard too: Tab or the arrow keys select, Enter confirms, Esc goes back one step.
Partner einladenInvite your partner
- Schick deinem Partner den Raumcode (Discord, WhatsApp, …). Am schnellsten geht das mit Code kopieren in der Karte „Erste Schritte“ oder mit Raumcode kopieren im Sync-Menü oben rechts.
- Er installiert die App, wählt im Startmenü Raum beitreten und tippt den Code ein.
- Fertig – ab jetzt seht ihr beide denselben Stand. Änderungen kommen in der Regel innerhalb einer Sekunde beim anderen an.
Wer den Code kennt, kann den Raum öffnen und ändern. Gib ihn nur deinem Partner und zeig ihn nicht im Stream. Ein Tippfehler öffnet übrigens einfach einen neuen, leeren Raum – vergleicht den Code, wenn ihr euch nicht seht.
- Send your partner the room code (Discord, WhatsApp, …). The quickest way is Copy code in the “First steps” card or Copy room code in the sync menu at the top right.
- They install the app, choose Join a room in the start menu and type in the code.
- Done – from now on you both see the same state. Changes usually arrive on the other side within a second.
Anyone who knows the code can open and change the room. Only give it to your partner and don’t show it on stream. A typo simply opens a new, empty room – compare the code if you don’t see each other’s changes.
„Wer bist du?““Who are you?”
Wenn du einen Soullink-Raum zum ersten Mal auf einem PC öffnest, fragt die App: Spieler 1, Spieler 2 oder Nur zuschauen? Die Antwort wird pro Raum auf diesem PC gemerkt. Solange ein Spieler noch keinen Namen hat, kannst du im selben Fenster gleich deinen Namen eintragen (optional, später änderbar im Kopf der Links-Liste).
- Damit weiß die App, wer du bist: für die Partner-Anzeige, für „Maze hat Rattfratz gefangen!“-Hinweise und dafür, auf welcher Seite das Auto-Tracking einträgt.
- Oben rechts in der Kopfzeile stehen danach eure Avatare, deiner ist leicht hervorgehoben. Ein Klick darauf öffnet das Sync-Menü; mit „Spieler wechseln“ änderst du die Wahl, zum Beispiel wenn ihr mal zu zweit an einem PC sitzt. Das geht auch unter Einstellungen › Raum & Sync.
- Im Nuzlocke-Modus gibt es nur einen Spieler, deshalb fragt die App dort nicht.
When you open a Soullink room on a PC for the first time, the app asks: Player 1, Player 2 or Just watching? The answer is remembered per room on this PC. As long as a player has no name yet, you can enter your name right in the same window (optional, you can change it later in the header of the links list).
- This tells the app who you are: for partner presence, for “Maze caught Rattata!” notices and for which side auto-tracking fills in.
- Afterwards the top right of the header shows your avatars, yours slightly highlighted. Click them to open the sync menu; “Switch player” changes your choice, for example when you both sit at one PC. You can also do this under Settings › Room & sync.
- Nuzlocke mode only has one player, so the app does not ask there.
Die Karte „Erste Schritte“The “First steps” card
In einem neuen Raum steht oben im Cockpit eine kurze Karte mit drei Schritten. Der jeweils nächste Schritt hat einen gelben Knopf:
- Route anlegen – legt die nächste Route eures Spiels an (zum Beispiel „Route 1 anlegen“) und öffnet gleich das Pokémon-Feld.
- Pokémon eintragen – pro Route trägt jeder sein gefangenes Pokémon ein. So entsteht ein Link.
- Partner einladen – zeigt den Raumcode und kopiert ihn mit Code kopieren. Im Nuzlocke steht hier stattdessen Regeln festlegen.
Erledigte Schritte bekommen einen Haken. Sind alle drei erledigt, verschwindet die Karte von selbst. Mit Ausblenden kannst du sie auch vorher wegklicken; wieder einschalten geht unter Einstellungen › Anzeige › Erste Schritte im Cockpit. Räume, die beim ersten Öffnen schon Einträge haben, zeigen die Karte nie.
Auch leere Seiten sagen dir, was als Nächstes kommt: Die leere Links-Liste und das Briefing haben einen Knopf „Route anlegen“, der leere Friedhof führt zurück zu den Links.
In a new room the top of the Cockpit shows a short card with three steps. The next step always has a yellow button:
- Add a route – adds the next route of your game (for example “Add Route 1”) and opens the Pokémon field right away.
- Enter Pokémon – per route, each of you enters the Pokémon you caught. That makes a link.
- Invite your partner – shows the room code and copies it with Copy code. In a Nuzlocke this step is Set your rules instead.
Finished steps get a check mark. Once all three are done, the card disappears on its own. Hide removes it earlier; turn it back on under Settings › Display › First steps in the cockpit. Rooms that already had entries when you first opened them never show the card.
Empty pages tell you what comes next, too: the empty links list and the briefing have an “Add route” button, the empty graveyard leads back to the links.
Die OberflächeFinding your way around
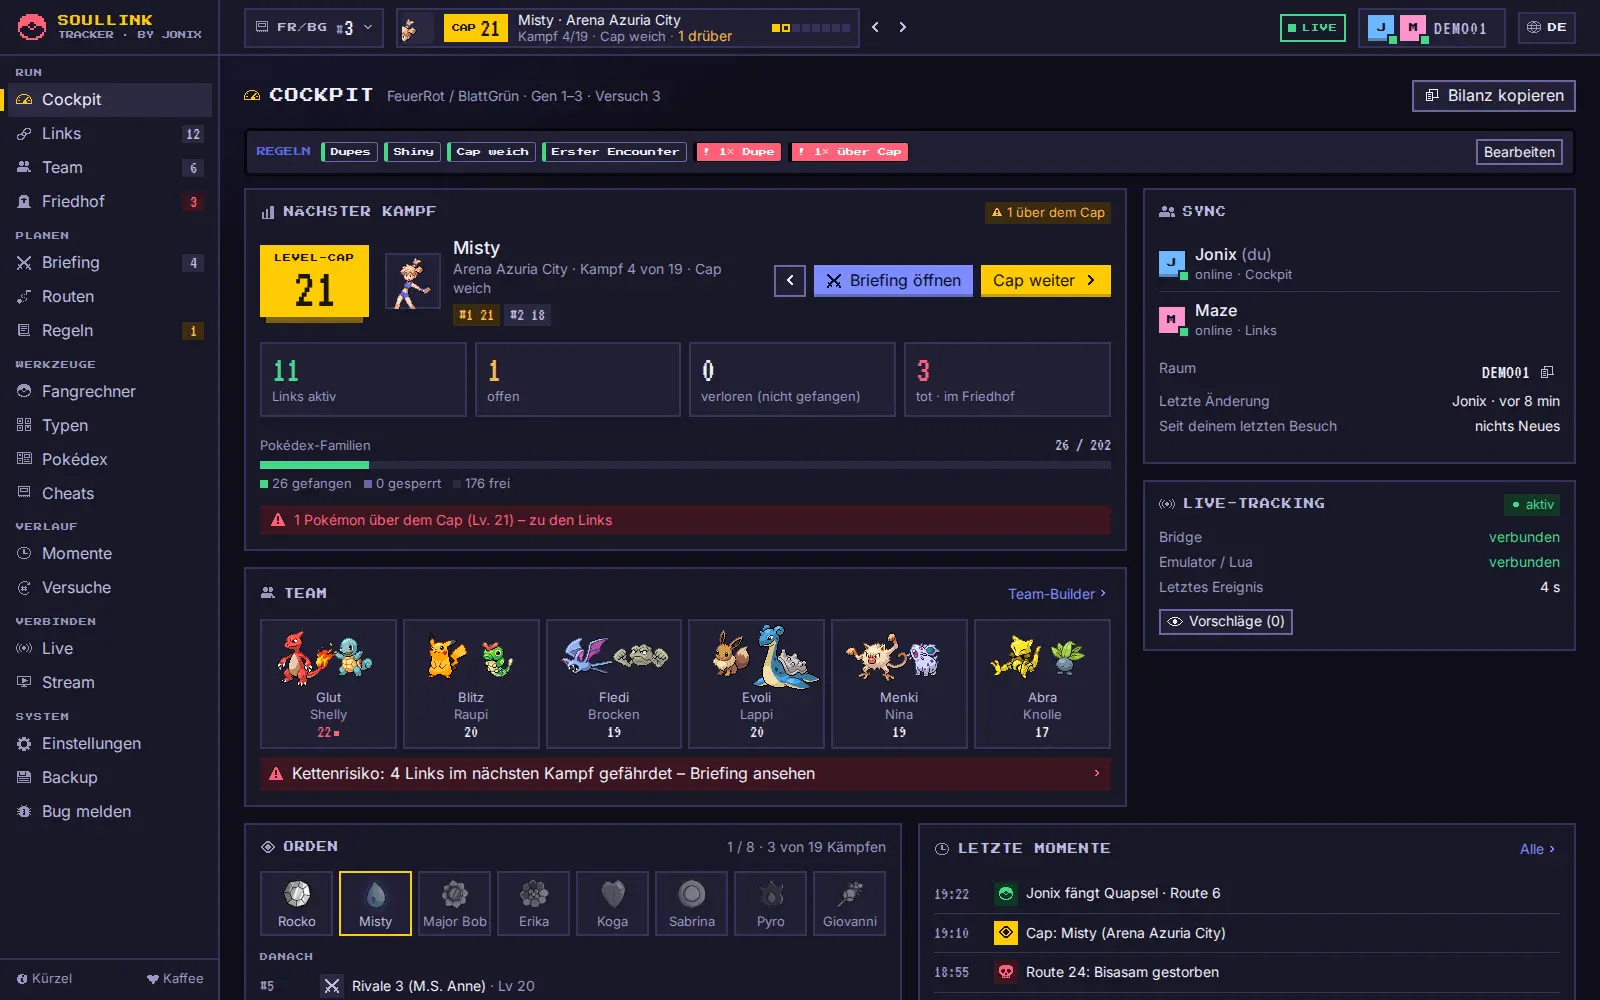
Links steht die Seitenleiste mit allen Seiten in sechs Gruppen. Zahlen neben einem Eintrag zeigen, was dort los ist (z. B. Links 12, Friedhof 4 in Rot). In schmalen Fenstern wird die Leiste zu einer Icon-Leiste, sehr schmal zu einer Leiste am unteren Rand mit „Mehr“.
| Gruppe | Was drin ist |
|---|---|
| RUN | Cockpit, Links, Team, Friedhof – der laufende Versuch |
| PLANEN | Briefing, Routen, Regeln |
| WERKZEUGE | Fangrechner, Typen, Pokédex, Cheats |
| VERLAUF | Momente, Versuche |
| VERBINDEN | LIVE (Auto-Tracking mit dem Emulator) und Stream (OBS-Overlay, Bausteine, Alerts) |
| SYSTEM | Einstellungen, Backup, „Bug melden“ |
Die Kopfzeile oben zeigt von links nach rechts: das Spiel mit Versuchsnummer (Klick öffnet das Run-Menü mit Versuch −/+, Edition und „Neuer Versuch …“), den Level-Cap mit Trainer-Bild und Orden-Fortschritt (Klick zeigt die Level jedes Gegner-Pokémon, „Geschafft – Cap weiter“ und „Kämpfe bearbeiten“), die LIVE-Anzeige, eure Avatare mit Raumcode und Speicherstatus (Klick öffnet das Sync-Menü mit „Raum wechseln“ und „Hauptmenü“) und rechts den Sprachknopf DE/EN.
Die Tasten 1 bis 7 springen zu Cockpit, Links, Team, Friedhof, Briefing, Routen und Regeln, [ und ] zur vorigen/nächsten Seite. Alle Kürzel stehen in Tastenkürzel.
Das Cockpit zeigt alles Wichtige auf einen Blick: den nächsten Kampf mit Level-Cap, Gegner-Level und „Cap weiter“, die Link-Zähler, den Pokédex-Fortschritt, beide Trainer, den LIVE-Status, euer Team, die Orden und die letzten Momente. Ein Klick auf einen Orden setzt den Level-Cap auf diesen Kampf.
- Hat dein Partner eingetragen, während du weg warst, steht in der Karte „Sync“ zum Beispiel „3 neue Ereignisse“. Ein Klick öffnet die Momente.
- Bilanz kopieren legt eine kurze Text-Bilanz in die Zwischenablage (Spiel, Versuch, Links aktiv/tot, Level-Cap, Orden) – zum Einfügen in Chat oder Stream-Titel.
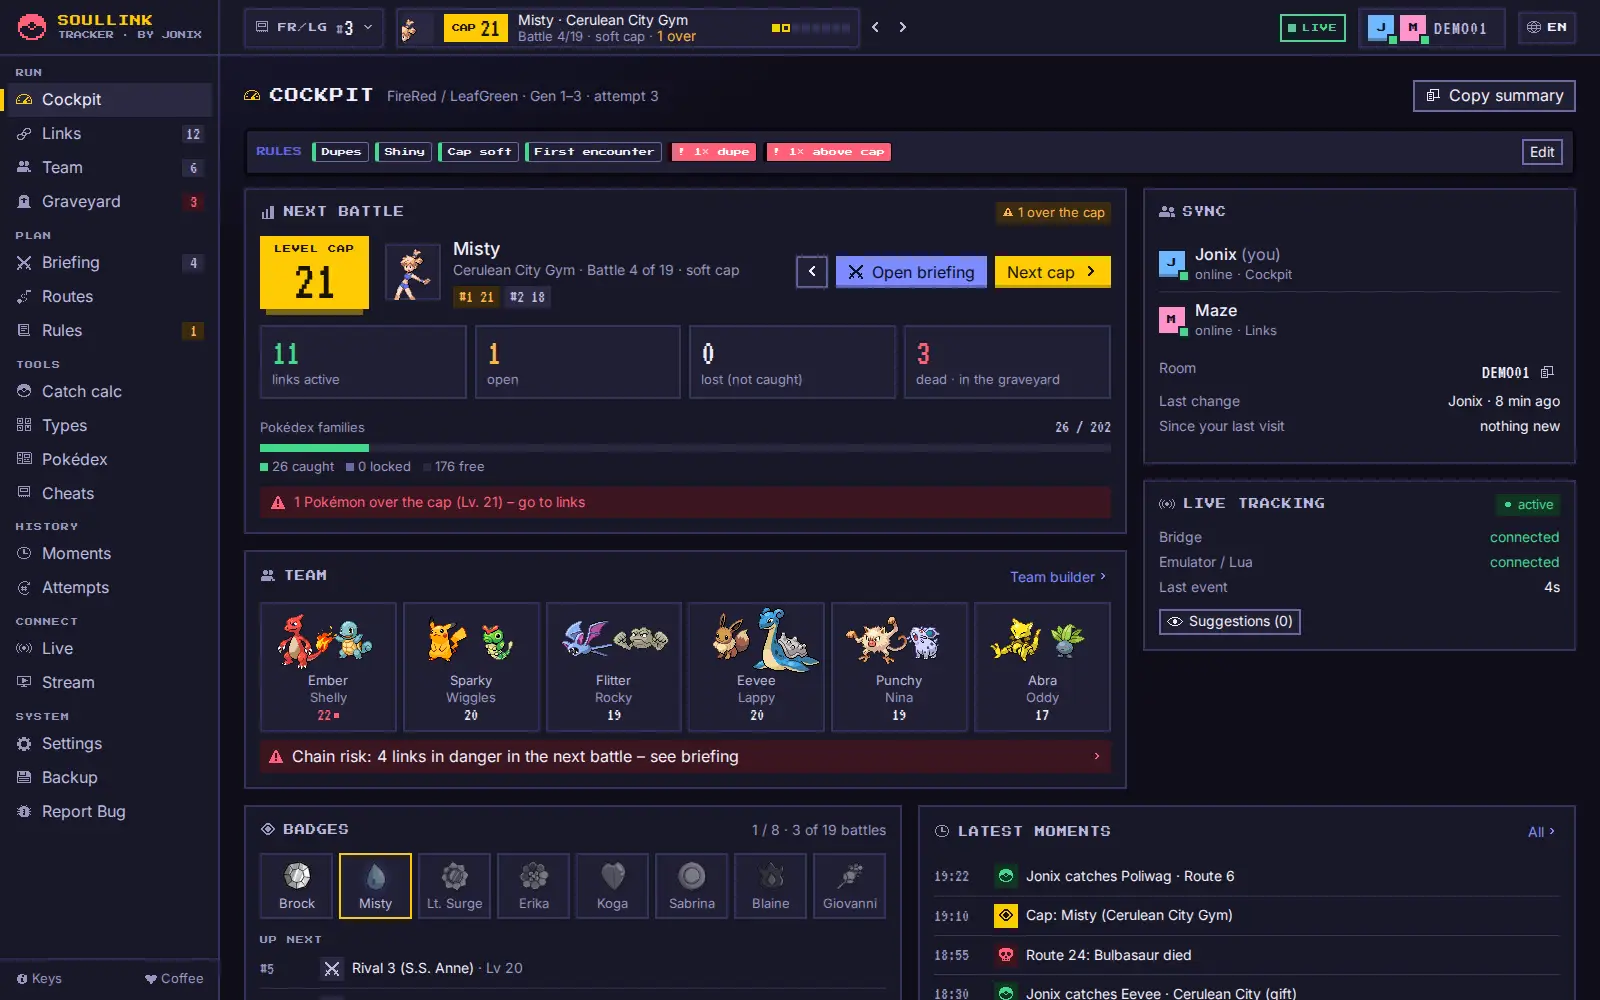
On the left is the sidebar with all pages in six groups. Numbers next to an entry show what is going on there (e.g. Links 12, Graveyard 4 in red). In narrow windows the sidebar turns into an icon bar, in very narrow ones into a bar at the bottom with “More”.
| Group | What’s inside |
|---|---|
| RUN | Cockpit, Links, Team, Graveyard – the current attempt |
| PLAN | Briefing, Routes, Rules |
| TOOLS | Catch calc, Types, Pokédex, Cheats |
| HISTORY | Moments, Attempts |
| CONNECT | LIVE (auto-tracking with the emulator) and Stream (OBS overlay, elements, alerts) |
| SYSTEM | Settings, Backup, “Report bug” |
The header shows, from left to right: the game with the attempt number (click for the run menu with attempt −/+, edition and “New attempt …”), the level cap with trainer picture and badge progress (click to see the level of every opponent Pokémon, “Cleared – next cap” and “Edit battles”), the LIVE indicator, your avatars with room code and save status (click for the sync menu with “Change room” and “Main menu”) and the DE/EN language button on the right.
Keys 1 to 7 jump to Cockpit, Links, Team, Graveyard, Briefing, Routes and Rules, [ and ] to the previous/next page. All shortcuts are listed in Shortcuts.
The Cockpit shows everything important at a glance: the next battle with level cap, opponent levels and “Next cap”, link counters, Pokédex progress, both trainers, the LIVE status, your team, the badges and the latest moments. Clicking a badge sets the level cap to that battle.
- If your partner logged things while you were away, the “Sync” card shows e.g. “3 new events”. A click opens the moments.
- Copy summary puts a short text summary on the clipboard (game, attempt, links alive/dead, level cap, badges) – to paste into a chat or stream title.
Partner-AnzeigePartner presence
- Avatare oben rechts in der Kopfzeile: Das kleine Quadrat unten rechts ist grün, wenn der Spieler online ist, sonst grau. Ein gelb blinkender Punkt davor heißt: Verbindung wird aufgebaut.
- Ein Klick auf die Avatare zeigt, in welcher Seite dein Partner gerade ist („MazeRunner2000 · online · Team“). Dieselbe Info steht im Cockpit in der Karte Sync.
- Avatars at the top right of the header: the small square at the bottom right is green when the player is online, grey otherwise. A blinking yellow dot in front means: connecting.
- Click the avatars to see which page your partner is on (“MazeRunner2000 · online · Team”). The Cockpit shows the same in the Sync card.