Begegnung eintragenLog an encounter
Der Tab Links (im Nuzlocke-Modus: Encounter) ist eine kompakte Liste: eine Zeile pro Route mit Nummer, Route, den beiden Pokémon samt Typen, ihrem Level und dem Status. Über der Liste filterst du nach Alle, Aktiv, Offen oder Team und suchst nach Route, Pokémon oder Spitzname. Die Spielernamen änderst du direkt im Kopf der Liste.
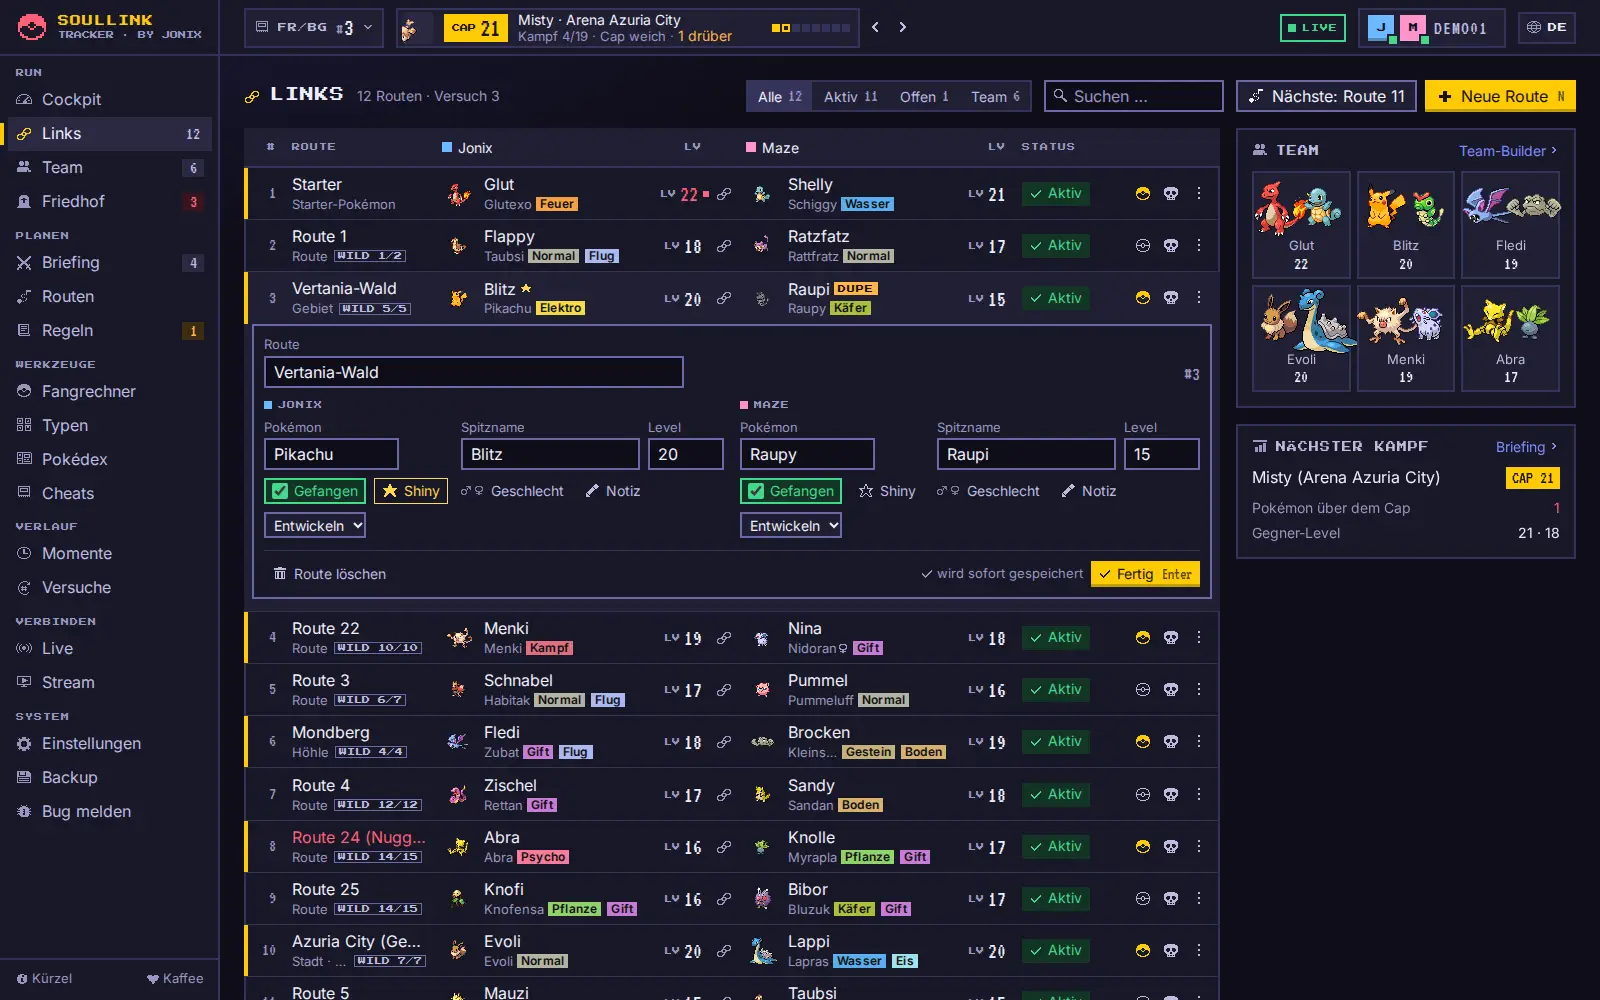
- Auf Neue Route klicken – oder auf Nächste: …, dann trägt die App gleich den nächsten noch offenen Ort eures Spiels ein.
- Unter der Zeile öffnet sich der Bearbeiten-Bereich. Dort den Routennamen eintragen, z. B. „Route 22“. Beim Tippen schlägt die App die Orte eurer Edition vor, auf Deutsch und Englisch.
- Jeder trägt auf seiner Seite das Pokémon ein, das er dort zuerst getroffen hat, dazu das Level. Deutsch oder Englisch ist egal: „Glumanda“, „Charmander“ und sogar „glumanda“ führen zum selben Pokémon.
- Fertig oder Enter schließt den Bereich, Esc ebenfalls. Alles wird sofort gespeichert.
Eine vorhandene Zeile öffnest du mit einem Klick (oder mit Tab hinwählen und Enter). Es ist immer nur eine Zeile offen. Solange nicht beide eingetragen haben, steht der Link auf Offen (gestreifte Zeile). Das Level braucht der Cap-Wächter (siehe Level-Caps): Liegt ein Pokémon über dem Level-Cap, wird nur seine Level-Zahl rot. Mit Auto-Tracking schlägt die App die Begegnung sogar selbst vor – siehe Auto-Tracking mit mGBA.
- Unter dem Routennamen steht die Ortsart (Route, Höhle, Gebiet …). Steht dort unbekannter Ort, kennt die App den Namen nicht (er zählt dann nicht im Routen-Tab).
- Ist der Routenname rot, steht dieser Ort schon bei einem anderen Link oder im Friedhof.
- Der kleine Knopf WILD 5/9 neben der Ortsart zeigt, welche Pokémon es dort gibt und wie viele davon noch frei sind.
Die Taste N legt direkt eine neue Route an und setzt den Cursor ins Routenfeld – aus dem Spiel heraus geht das mit Strg+Alt+N. Alle Kürzel: Tastenkürzel.
The Links tab (Nuzlocke mode: Encounters) is a compact list: one row per route with number, route, both Pokémon with their types, their level and the status. Above the list you filter by All, Active, Open or Team and search for a route, Pokémon or nickname. You change the player names right in the list header.
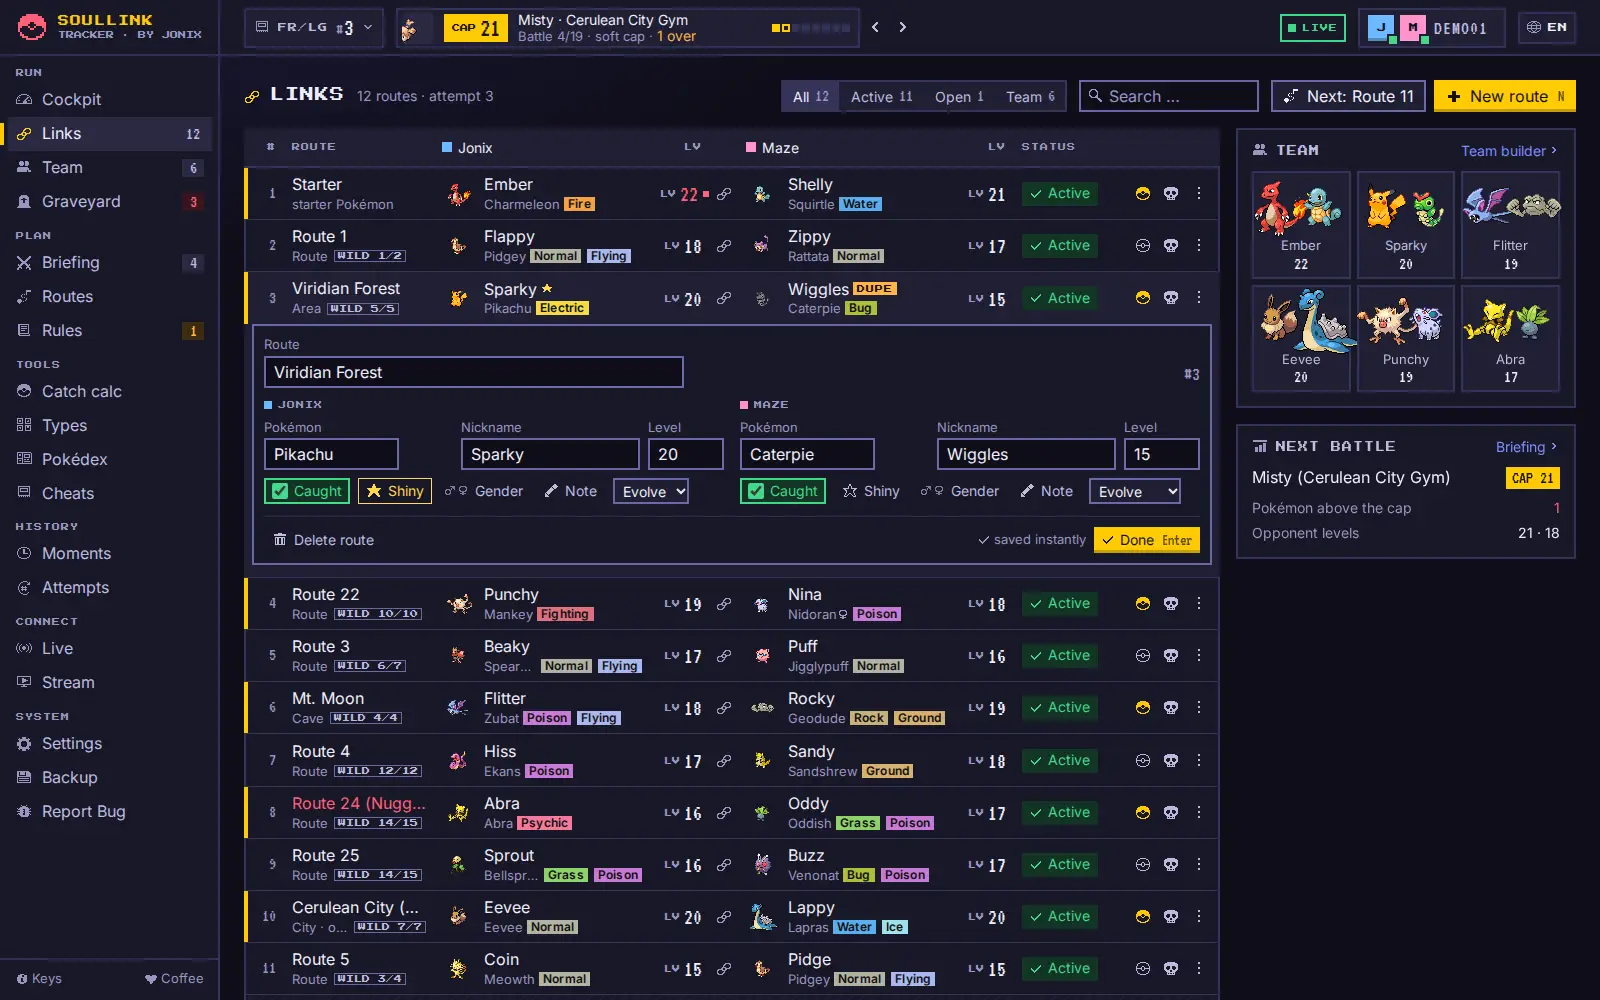
- Click New route – or Next: …, which adds the next location of your game that is still open.
- The edit area opens below the row. Enter the route name there, e.g. “Route 22”. While you type, the app suggests the locations of your edition, in English and German.
- Each player enters the Pokémon they met there first on their own side, plus its level. English or German doesn’t matter: “Charmander”, “Glumanda” and even “charmander” lead to the same Pokémon.
- Done or Enter closes the area, so does Esc. Everything is saved right away.
Open an existing row with a click (or reach it with Tab and press Enter). Only one row is open at a time. As long as not both have entered something, the link is Open (striped row). The cap guard needs the level (see Level caps): if a Pokémon is above the level cap, only its level number turns red. With auto-tracking the app even suggests the encounter itself – see Auto-tracking with mGBA.
- Below the route name you see the kind of location (route, cave, area …). If it says unknown location, the app doesn’t know the name (it won’t count in the Routes tab).
- A red route name means this location is already used by another link or in the graveyard.
- The small WILD 5/9 button next to the kind of location shows which Pokémon live there and how many of them are still free.
The N key adds a new route straight away and puts the cursor into the route field – from inside your game use Ctrl+Alt+N. All shortcuts: Shortcuts.
Gefangen & Link besiegeltCaught & link sealed
Hast du das Pokémon gefangen, setzt du im Bearbeiten-Bereich den Haken bei Gefangen. Sind beide Pokémon eines Links gefangen, rastet die Kette ein und der Link ist Aktiv (grüner Haken).
- Nur aktive Links (beide gefangen, beide lebendig) können ins Team. Das geht direkt in der Zeile über den Pokéball-Knopf oder im Team-Builder. Team-Links haben links eine gelbe Kante.
- Ist ein Pokémon entkommen oder besiegt worden, bleibt es ungefangen: Der Link steht dann auf Verloren, das Pokémon ist grau und durchgestrichen. Die ganze Evolutionslinie gilt im Pokédex als gesperrt.
- Fängt dein Partner etwas, siehst du unten rechts eine kurze Textbox („Maze hat Rattfratz gefangen!“).
Welche Begegnungen nach euren Regeln (Dupes-Clause & Co.) gar nicht zählen, markiert die App mit DUPE am Namen – siehe Regeln.
Once you caught the Pokémon, tick Caught in the edit area. When both Pokémon of a link are caught, the chain locks in and the link is Active (green tick).
- Only active links (both caught, both alive) can join the team. You can add them right in the row with the Poké Ball button or in the Team Builder. Team links have a yellow edge on the left.
- If a Pokémon fled or was knocked out, it stays uncaught: the link is then Lost, the Pokémon is grey and struck through. Its whole evolution line counts as locked in the Pokédex.
- When your partner catches something, a short text box appears at the bottom right (“Maze caught Rattata!”).
Encounters that don’t count under your rules (dupes clause and co.) are flagged DUPE next to the name – see Rules.
Spitzname, Shiny, Geschlecht & NotizNickname, shiny, gender & note
Im Bearbeiten-Bereich gibt es für jedes eingetragene Pokémon:
- Spitzname – einfach tippen, wird automatisch gespeichert. In der Liste steht dann der Spitzname groß und die Art klein darunter; auch das Overlay zeigt ihn.
- Shiny – an/aus. Das Sprite wechselt auf die Shiny-Grafik, hinter dem Namen erscheint ein Stern, dazu gibt es Glitzer.
- Geschlecht – ein Klick schaltet weiter: keins, männlich, weiblich. Das Zeichen steht dann hinter dem Namen.
- Notiz – zum Beispiel „hat Rocko solo gelegt“. Sie erscheint, wenn du mit der Maus über das Sprite fährst; ein kleiner Stift am Namen zeigt, dass es eine gibt.
Ob Pokémon-Namen deutsch oder englisch angezeigt werden, stellst du in den Einstellungen ein – das gilt nur für deinen PC.
In the edit area every entered Pokémon has:
- Nickname – just type, it saves automatically. The list then shows the nickname large with the species below; the overlay shows it too.
- Shiny – on/off. The sprite switches to the shiny artwork, a star appears after the name, with some sparkle.
- Gender – a click cycles through none, male, female. The symbol then shows after the name.
- Note – for example “soloed Brock”. It appears when you hover the sprite; a small pencil next to the name shows that there is one.
Whether Pokémon names are shown in English or German is set in Settings – it only applies to your PC.
EntwickelnEvolving
Entwickelt sich ein Pokémon, wähle im Bearbeiten-Bereich im Auswahlfeld Entwickeln zu … die neue Form. Spitzname, Shiny und Notiz bleiben erhalten – Blitzi bleibt Blitzi, auch als Raichu. Alternative Formen (Alola, Galar, Mega …) wählst du für die Team-Analyse im Formen-Feld.
When a Pokémon evolves, pick the new form in the Evolve into … select of the edit area. Nickname, shiny and note are kept – Sparky stays Sparky, even as Raichu. Alternate forms (Alolan, Galarian, Mega …) are chosen in the form field for the team analysis.
Todes-DialogDeath dialog
Ist ein Pokémon gestorben, klickst du in seiner Zeile auf den Totenkopf. Statt es einfach wegzuschieben, öffnet sich die Textbox „EIN LINK IST GEFALLEN“:
- Wer ist zuerst gestorben? Spieler 1, Spieler 2 oder Beide (im Nuzlocke-Modus entfällt die Frage).
- Ursache: Volltreffer, Fehlentscheidung, Gift/Status, Überlevelter Gegner, Trainer, Wildes Pokémon oder Sonstiges.
- Killer – der Trainer oder das gegnerische Pokémon, mit Vorschlagsliste.
- Level für jede Seite. Den Kampfabschnitt übernimmt die App automatisch vom aktuellen Level-Cap.
Mit Beisetzen wandert der ganze Link – beide Pokémon – auf den Friedhof. Das Team-Feld bleibt frei, die anderen rutschen nicht nach. Abbrechen oder Esc lässt den Link leben. Bei deinem Partner erscheint der Tod sofort mit einem dezenten Hinweis. Wer lieber ohne Dialog spielt, schaltet ihn unter Einstellungen > Friedhof ab – dann wandert der Link beim Totenkopf sofort auf den Friedhof.
Im Friedhof holt Wiederbeleben den Link zurück. Deine letzte eigene Aktion kannst du außerdem in der Momente-Timeline rückgängig machen.
When a Pokémon has died, click the skull in its row. Instead of simply moving it away, the text box “A LINK HAS FALLEN” opens:
- Who died first? Player 1, player 2 or both (not asked in Nuzlocke mode).
- Cause: critical hit, misplay, poison/status, overleveled foe, trainer, wild Pokémon or other.
- Killer – the trainer or the opposing Pokémon, with a suggestion list.
- Level for each side. The battle segment is taken from the current level cap automatically.
Lay to rest moves the whole link – both Pokémon – to the graveyard. The team slot stays empty; the others don’t shift. Cancel or Esc keeps the link alive. Your partner sees the death right away with a subtle notice. If you’d rather play without the dialog, turn it off under Settings > Graveyard – then the skull moves the link to the graveyard right away.
In the graveyard, Revive brings the link back. You can also undo your own last action in the moments timeline.
FriedhofGraveyard
Der Tab Friedhof zeigt jeden gefallenen Link als Grab-Karte: Route und Zeitpunkt (das genaue Datum steht im Tooltip), beide Pokémon mit grauem Sprite und Level, darunter Ursache, Killer, Datum und Kampfabschnitt. Wer zuerst gestorben ist, ist rot hinterlegt und als Opfer markiert.
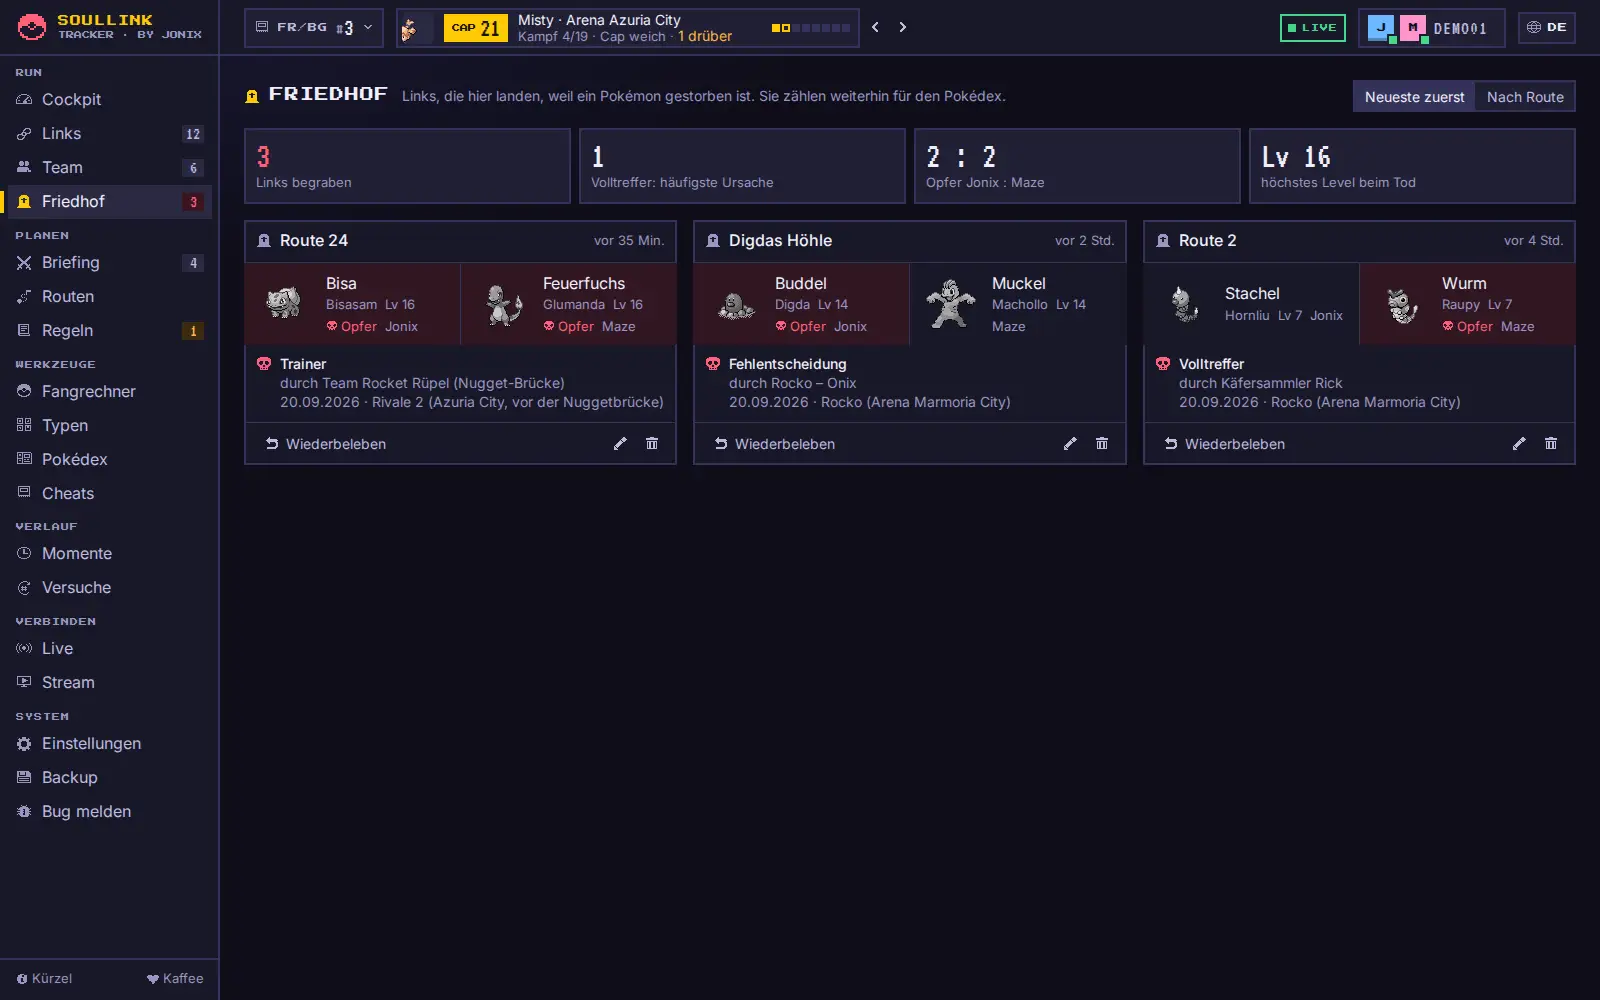
- Oben stehen vier Kennzahlen: wie viele Links begraben sind, die häufigste Ursache, die Opfer je Spieler und das höchste Level beim Tod.
- Sortieren kannst du nach Neueste zuerst oder Nach Route.
- Wiederbeleben holt einen Link zurück zu den Links.
- Der Stift öffnet den Todes-Dialog noch einmal, um Opfer, Ursache, Killer oder Level nachträglich zu korrigieren.
- Der Mülleimer löscht den Eintrag für immer (mit Nachfrage).
- Tote Pokémon zählen weiter für den Pokédex – ihre Linie bleibt also verbraucht.
Tote ohne Angaben (z. B. mit ausgeschaltetem Todes-Dialog) zeigen „Ursache unbekannt“.
The Graveyard tab shows every fallen link as a grave card: route and time (the exact date is in the tooltip), both Pokémon with a grey sprite and their level, below that cause, killer, date and battle segment. Whoever died first is highlighted in red and marked as victim.
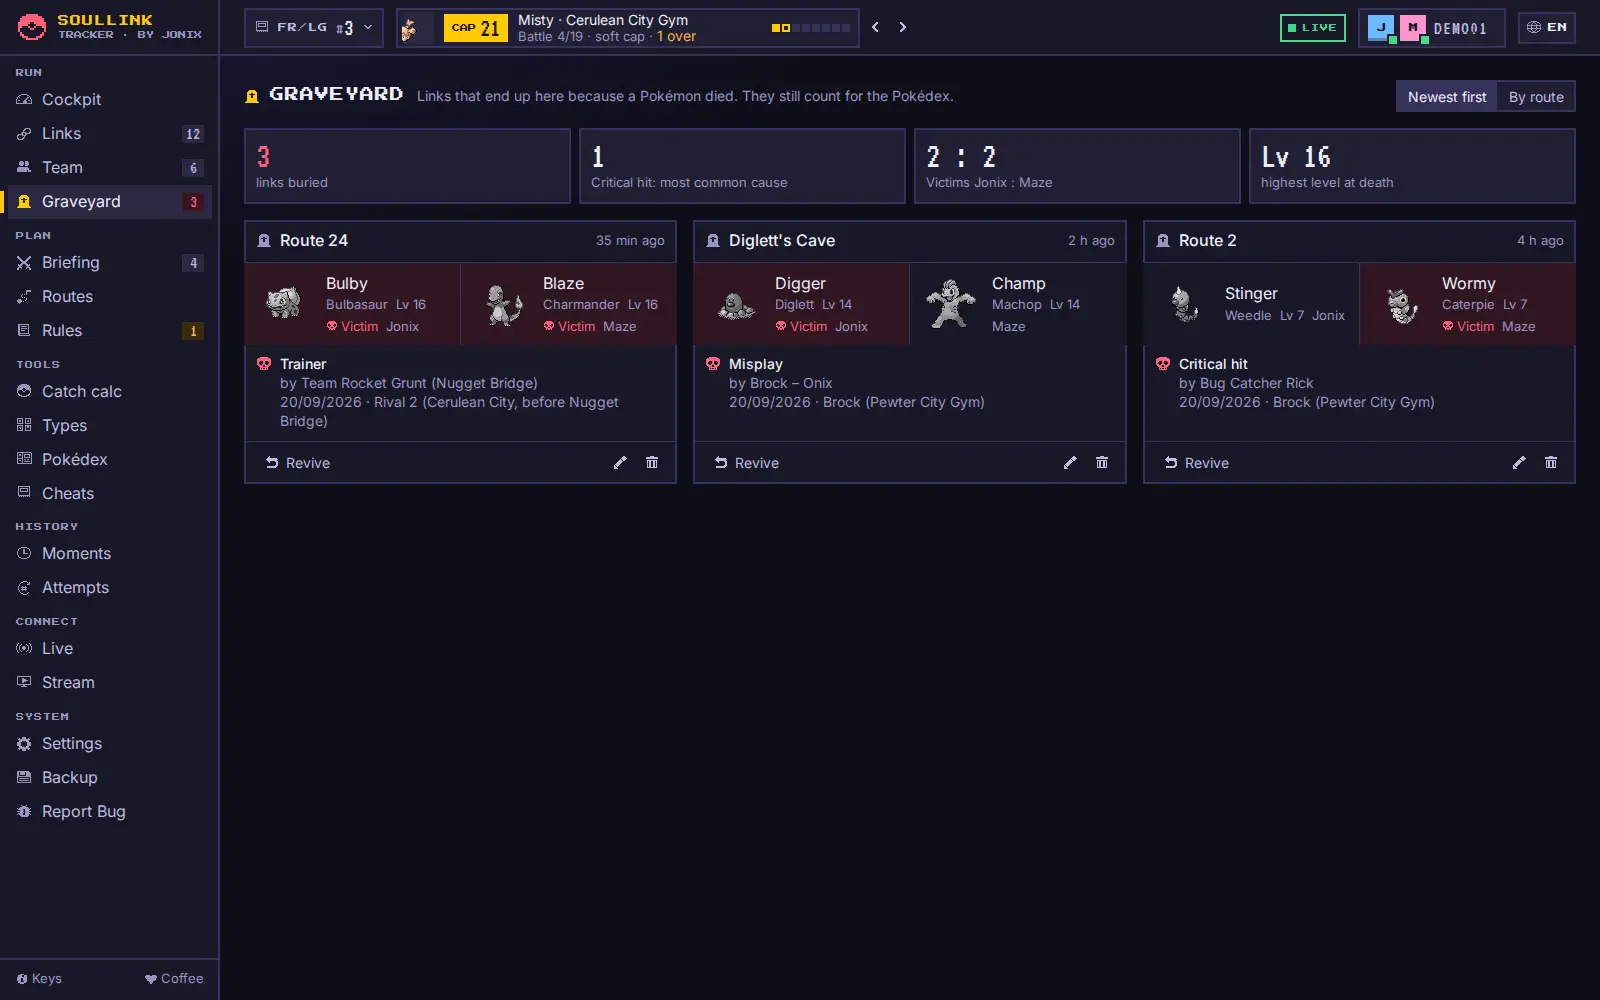
- At the top there are four figures: how many links are buried, the most common cause, the victims per player and the highest level at death.
- Sort by Newest first or By route.
- Revive brings a link back to Links.
- The pencil opens the death dialog again to correct victim, cause, killer or level later.
- The trash can deletes the entry for good (with confirmation).
- Dead Pokémon still count for the Pokédex – their line stays used up.
Deaths without details (e.g. with the death dialog turned off) show “Cause unknown”.
Momente-Timeline & RückgängigMoments timeline & undo
Der Tab Momente (Taste M) listet euren Run Eintrag für Eintrag, das Datum steht einmal pro Tag: Begegnungen, Fänge, Tode, Entwicklungen, Shinys, Orden und Versuche.
- Oben stehen vier Zahlen für den gewählten Versuch: Fänge, Tode, Orden und alle Momente. Jeder Eintrag hat ein farbiges Symbol links (grüner Pokéball = Fang, roter Totenkopf = Tod, gelber Orden = Level-Cap geschafft).
- Filter Alle / Fänge / Tode / Orden / Sonstiges und die Auswahl Aktueller Versuch, Alle Versuche oder ein bestimmter Versuch.
- Rückgängig erscheint nur am neuesten Eintrag, und nur wenn er von dir stammt. Aktionen deines Partners bleiben unangetastet, damit ihr euch nicht gegenseitig etwas wegnehmt. Es gibt immer nur diesen einen Schritt zurück.
- Als Text kopieren legt die gefilterte Auswahl als kleine Geschichte in die Zwischenablage – praktisch für Chats und Notizen.
The Moments tab (key M) lists your run entry by entry, with the date shown once per day: encounters, catches, deaths, evolutions, shinies, badges and attempts.
- At the top you see four numbers for the selected attempt: catches, deaths, badges and all moments. Every entry has a coloured symbol on the left (green Poké Ball = catch, red skull = death, yellow badge = level cap beaten).
- Filters All / Catches / Deaths / Badges / Other and a selection of current attempt, all attempts or one specific attempt.
- Undo only appears on the newest entry, and only if it is yours. Your partner’s actions are left alone, so you don’t take things away from each other. There is always just this one step back.
- Copy as text puts the filtered selection on the clipboard as a little story – handy for chats and notes.
Neuer Versuch & ArchivNew attempt & archive
Ist der Run vorbei, öffnest du oben links in der Kopfzeile das Run-Menü (Spiel und Versuchsnummer) und wählst Neuer Versuch …. Die Textbox „VERSUCH BEENDEN“ fragt nach dem Grund – Wipe, Aufgegeben, Champion besiegt (Run gewonnen!) oder Sonstiges – und einer optionalen Notiz. Mit Versuch beenden & neu starten werden Links, Friedhof und Team geleert und der Versuch-Zähler steigt. Spielernamen, Cheats und die Kampfliste bleiben erhalten.
Gelöscht wird dabei nichts: Der alte Run landet als Spielstand im Tab Versuche.
- Oben stehen die Zahl der Versuche, der beste Versuch (am weitesten gekommen) und die Siege.
- Details klappt Links und Friedhof eines alten Versuchs auf.
- Wiederherstellen holt einen alten Spielstand zurück – ideal, wenn jemand aus Versehen „Neuer Versuch“ gedrückt hat. Der laufende Stand wird vorher selbst als Spielstand gesichert.
- Die App hebt die letzten 20 Spielstände auf; ältere zählen nur noch bei den Versuchen und Siegen mit.
Wählt ihr Champion besiegt, erscheint zuerst die Textbox „GESCHAFFT!“ mit eurem Sieger-Team, den Toden, den Versuchen bis zum Sieg und der Dauer. Bei deinem Partner öffnet sie sich automatisch mit. Später erreicht ihr sie im Tab Versuche über Geschafft!.
When the run is over, open the run menu at the top left of the header (game and attempt number) and choose New attempt …. The “END ATTEMPT” text box asks for the reason – Wipe, Gave up, Champion defeated (run won!) or Other – and an optional note. End attempt & restart clears links, graveyard and team, and the attempt counter goes up. Player names, cheats and the battle list are kept.
Nothing is deleted: the old run is stored as a save file in the Attempts tab.
- At the top you see the number of attempts, the best attempt (the one that got furthest) and the wins.
- Details expands the links and graveyard of an old attempt.
- Restore brings an old save file back – perfect if someone pressed “New Attempt” by accident. The current state is saved as its own save file first.
- The app keeps the latest 20 save files; older ones only still count towards attempts and wins.
If you pick Champion defeated, the “VICTORY!” text box appears first with your winning team, deaths, attempts to win and duration. It opens for your partner automatically too. Later you can reach it in the Attempts tab via Victory!.
Routen & wilde PokémonRoutes & wild Pokémon
Die App kennt für alle 18 Editionen die Orte mit wilden Pokémon in Story-Reihenfolge. Der Tab Routen zeigt links die Liste aller Orte mit Fortschrittsbalken („14 / 57 Orte besucht“) und rechts das Detail des gewählten Orts:
- Das farbige Nummernkästchen zeigt den Stand: grün = aktiv, gelb = offen, grau = nicht beide gefangen, rot (Name durchgestrichen) = tot, nur Rahmen = noch nicht besucht, gestrichelt = optionaler Ort (Städte, Postgame).
- Der nächste freie Ort trägt den Chip nächste. Oben rechts legt der gelbe Knopf (z. B. Route 10 anlegen) genau diesen Link an – wie „Nächste Route“ im Links-Tab.
- Ein Klick auf einen Ort wählt ihn aus. Das Detail zeigt eure Pokémon dort und die Knöpfe Link anzeigen, Link hier anlegen bzw. Im Friedhof ansehen.
- Darunter steht die Tabelle Wilde Pokémon: Art, Ort (Gras, Angel, Surfer …), Level und Chance. Arten, die nach eurer Dupes-Klausel schon zählen, sind mit einem Schloss gesperrt und durchgestrichen; „5/9 frei“ zeigt, wie viele noch gehen. Der kleine Rechner-Knopf öffnet den Fangrechner gleich mit dieser Art.
- Der Schalter Optionale Orte blendet Städte und Postgame-Orte ein oder aus.
For all 18 editions the app knows the locations with wild Pokémon in story order. The Routes tab shows the list of all locations with a progress bar (“14 / 57 locations visited”) on the left and the details of the selected location on the right:
- The coloured number box shows the state: green = active, yellow = open, grey = not both caught, red (name struck through) = dead, just a frame = not visited yet, dashed = optional location (towns, postgame).
- The next free location has the chip next. The yellow button at the top (e.g. Create Route 10) creates exactly that link – like “Next route” in the Links tab.
- Clicking a location selects it. The details show your Pokémon there and the buttons Show link, Create link here or Show in graveyard.
- Below is the Wild Pokémon table: species, method (grass, fishing, surfing …), level and rate. Species that already count under your dupes clause are locked and struck through; “5/9 free” tells you how many are left. The small calculator button opens the catch calculator with that species.
- The Optional places switch shows or hides towns and postgame locations.